

Introduction
When completing necessary paperwork on the web, fillable PDF forms are often used in place of official paper documents. There are two popular ways to make a fillable PDF. One is by using Adobe Acrobat, and the other one is without using Adobe Acrobat. Many people prefer the fillable PDF creation method without using Adobe Acrobat as it is expensive software. Here is our recommended step by step guide if you are interested in making fillable PDF without using Adobe Acrobat. However, if you want to do it using Adobe Acrobat, this is the article for you.
Creating a Fillable PDF Using Adobe Acrobat
The following steps are to be followed to create a fillable PDF using Adobe Acrobat:
- Open Adobe Acrobat on your computer. Adobe Acrobat is an app to create and manage PDF files, and it allows you to create fillable PDFs.
- Click the “Tools” menu at the top of the app.
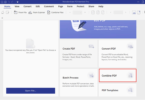
- Click on “Prepare Form,” which is the purple icon close to the window’s center.
- Click on “Select a File,” and this allows you to import Excel, Word, or non-fillable PDF files into Acrobat.
- Double click the document’s name to select the document you want to import.
- Build your form by clicking “Start” and import the file. According to the appearance of the document, Adobe Acrobat will try to create fillable fields. You can edit as well as add new ones according to the requirements.
- Select “Prepare Form” by clicking the Tools menu at the top of the screen. In this way, you will come to the editing mode. Now you can create new fields, add elements, and edit the existing ones.
- This is the time to edit an existing text field. Adobe Acrobat tries to create fields according to your document’s layout.
- To add a new field, click the “Text Field” tool. Just right-click the field and select “Copy” instead if you want to copy an existing field.
- This is the time to click the location where you want to add a text field. It will place a field of default size at this location. You can also click and drag your mouse if you are going to draw a specific sized box. A yellow box will appear once the field is placed. Just right-click the desired location and select Paste if you want to place a copied field.
- Type a name on the “Field Name” box. This will not be visible on the final version of the form as it is for your reference only. Check the box next to the “Required field” below the “Field Name” blank if you want to make filling out this field compulsory.
- You can access the field’s editing tools by clicking on “All Properties.” With this dialog box, you can edit the appearance of the field and also add special options.
- If you want to edit the text field, format your field by clicking on different tabs on the “Text Field Properties” dialog. You can click the Options tab, the Appearance tab, the Actions tab, and a few more tabs for different purposes. When you are done with editing, click “Close.”
- There are different options if you are interested in adding menus, buttons, and other options. Just bring your cursor on different icons next to the Text Field tool to see what kind of form item it represents.
- You can preview your form by clicking “Preview” at the top-right corner. In this way, you can view and test the fillable PDF.
- If you want to return to editing mode, click “Edit” which is at the top-right corner. Here you can make final changes.
- There is a File menu at the top-left corner. From here, you can select “Save As” to save the form to your PC. Just choose a saving location and click Save. You can always re-open and edit this form later.
- Now you want to distribute or send this fillable PDF to different recipients. As long as you are in editing mode, click “Distribute” which is at the bottom-right corner of the panel. The results will be automatically collected in your preferred format if you send the form to recipients using this feature.
- Select your desired option on how you want to receive the form results. Select the “Email” option if you are going to receive the results via email. Select “Internal Server” if you have a web server set up to collect results.
- Suppose you have chosen the Email option. Now, you will be asked to enter a bit more information.
- You need to enter the email addresses of all the recipients. Don’t forget to separate each email address with a comma. You can also enter your own email address if you are not ready to send the form to other people. Type your custom message with the form.
That’s it! We hope you will find this article helpful if you are looking to make a fillable PDF. Don’t forget to share your thoughts and comments about this article. It is goodbye!

You must be logged in to post a comment.