I’m gonna show you how to speed up your website using Cloudflare or CDN network and boost your ranking in search results because the speed of the website matters on top 10 search results and this method is also free of cost.
A content delivery network or CDN, every so often known as a content material distribution community is gonna assist speed up your internet site. We recognize every time any person is going to your web web page.
could be the home web page or different pages. And every web page to your internet site takes some amount of time to load.
Introduction About Content Delivery Network or (CDN)
Well Google looks at that as a ranking factor and the fast to your site loads and it is better in the eyes of all search engine and better your rank will be within the search results so by using an IP it’s basically like putting your blog in the cloud so for example If your blog is hosted in the us, alright you’re us based somebody in us opens up your site that information doesn’t have that far to travel right.
There is the same country as you but if somebody in Australia wants to look at your website, that information that has to travel all the way to Australia and it’s gonna take longer for somebody in other countries to load your page, so what does is when it put your information in the cloud.
It has it in different places, all over the world, so that no matter where Are you open your page in the world. It has a shorter distance to travel now to the second I’m gonna demonstrate the service that you can use to obtain a CDN for free called cloud flare.
Now, in addition to providing CDN services for free cloud flare also gives you SSL. Now, SSL is a type of security it’s sort of like an encryption-free your website so if you’ve ever seen a Web address where normally would say HTTP://.
You might have noticed it highlighted in Green on some Bank websites from cloud flare, actually the cloud flare website you’ll see it when I show you the demo article has HTTPS and it comes with all their plans, even the free one and Google just started using sites that have SSL as a ranking factor.
Meaning they’ll give you a slight it’s, a small difference, but it will give you a slight improvement in rankings if you have so sold your site it’s Google’s way of encouraging people to safeguard the Web and people state who enter other website being right now isn’t giving any ranking benefit for SSL. But, I want to show you how to set up the CDN network in the next article so check it out.
How To Setup Cloud Flare (CDN) And Boost Your Website Speed Into Seconds
1. Go To CloudFlare.com And SignUp
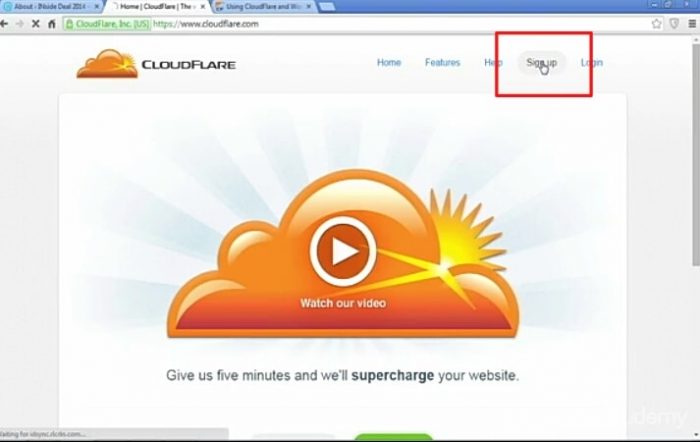
Go To CloudFlare.com And SignUp
So this is the front page of Cloudflare at cloudflare.com and once you get to the home page, you just gonna click sign up and you’ll go through the basic sign up process. There’s no credit card information or anything like that. It’s just an email confirmation and I’ve skipped that part just for the sake of brevity here, so you’re gonna add your website once you’ve confirmed your email address.
2 Add Website For CDN
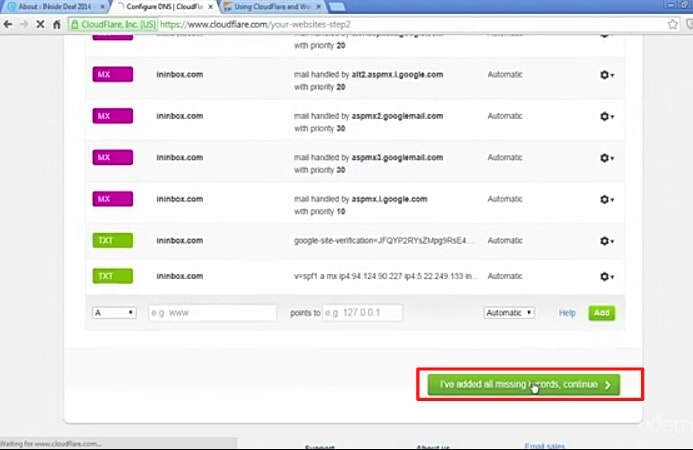
configure your DNS record.
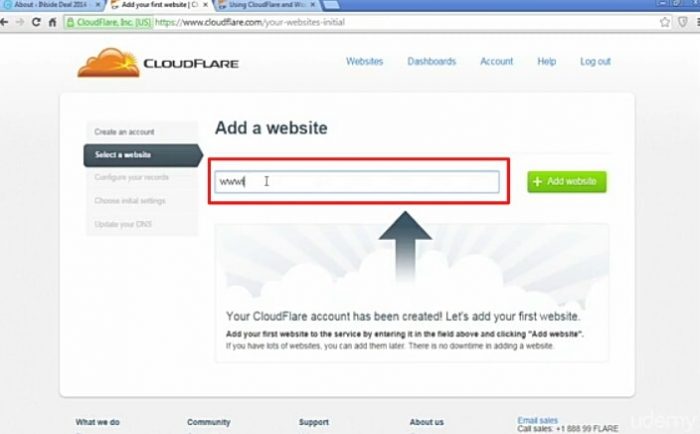
Add Website For CDN
whatever website that you want to create a CDN for and then you just click add website. Now here you’re gonna configure what’s called your DNS record.
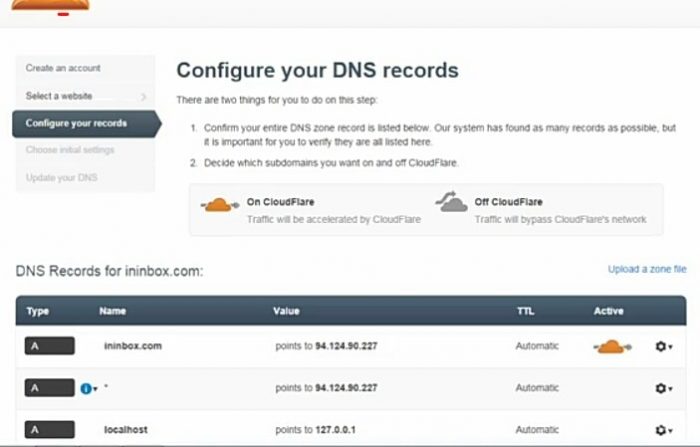
configure your DNS record using Cloud Flare
Your domain name system records and this is really really simple for example if you had a blog and maybe your blog at blog.yourwebsite.com. It’s gonna point in all of those possibilities, so for example, Google has maps.Google.com and it’ll point in all the domains are called subdomain, subdomains will be like the maps.Google.com.
3 Then Continue
just press continue
If they have everything so just click continue,
4 Choose Free Plan or Any Plan You Want
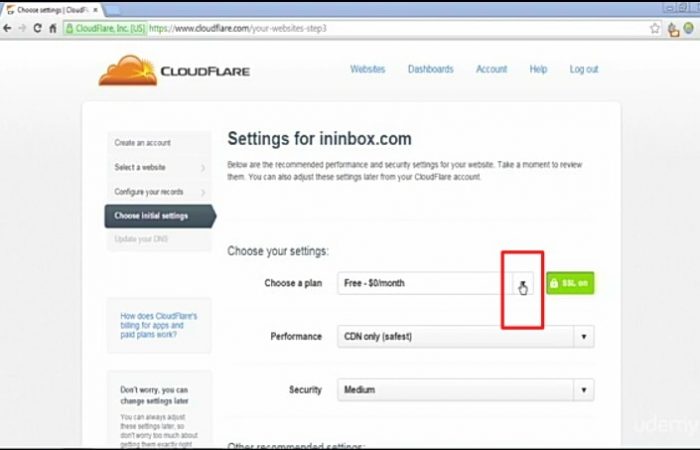
Choose Free Plan or Any Plan You Want
Now there are three options It was then the free one that I mention we’re gonna do the free plan just for this, demo here
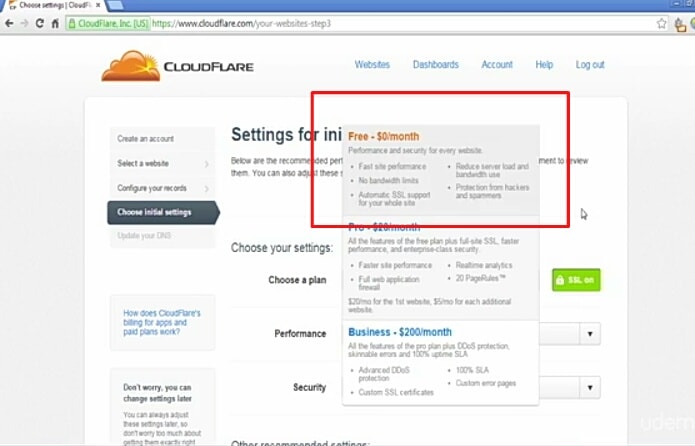
Choose cloud flare plans
5 Then Continue
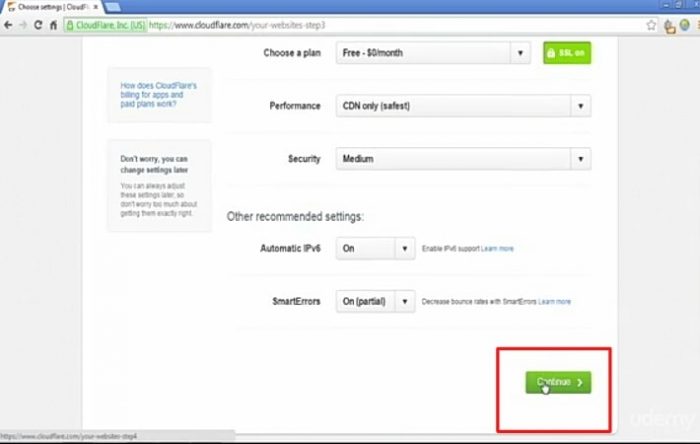
just gonna click continue
then we’re just gonna click continue.
6 Update Name Servers
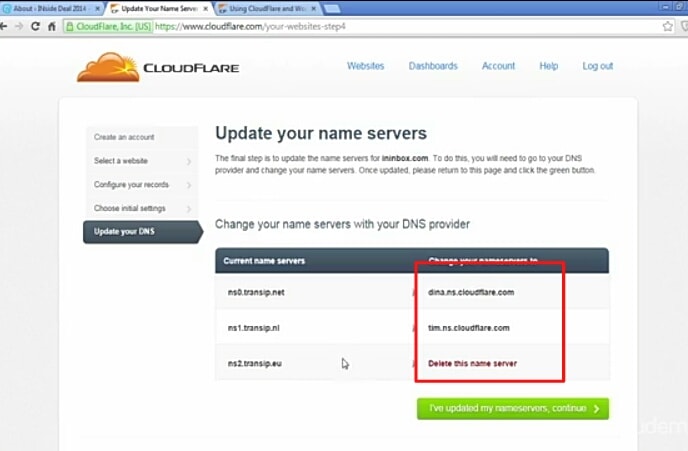
Copy Name Server
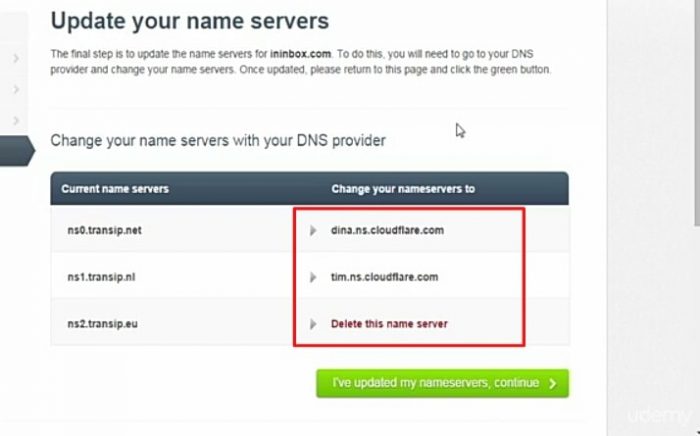
Now, what you’re doing with CDN, transferring your data from your current host, wherever your information is located to cloud flares host, which are all over the world.
So on the next page, it’s gonna tell you to step by step. How to do that for basically, all of the major hosts says that has Internet that register.com fast domain domain.com and I’m gonna include this link in the resources so that whatever host you use, you configure out how to transfer all of your information to cloud flare, so you just click on whatever post you have and it’s really easy it’s just step by step.
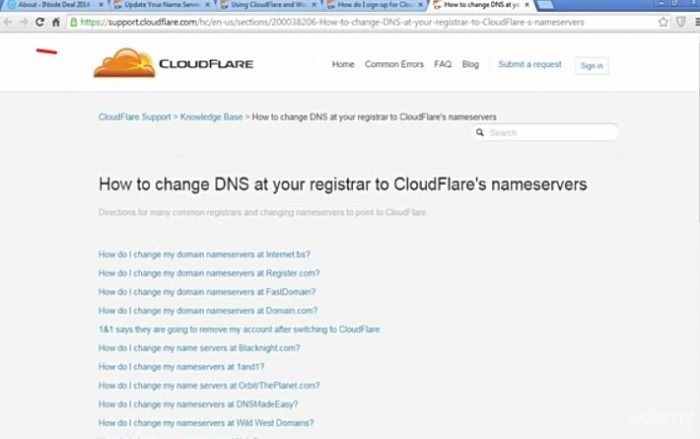
Also, visit this page for help
You just logging into your account and then it’s gonna walk you through the process, make it very easy for you and I didn’t wanna leave you hanging so I’m just gonna give you a quick example here of how to change your server from your current host to cloud flares so I know that the common place to buy websites is going daddy.com and so I’m here in my account and I just wanna show you how easy it is to do this, but I gonna give us quick example because I don’t really like the way people explain things sometimes, so if you just click launch
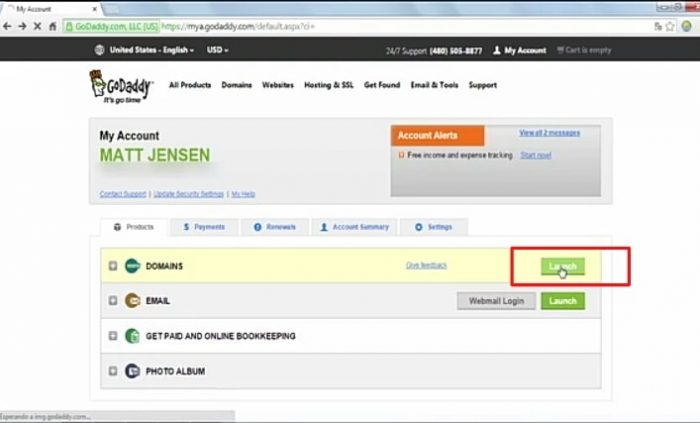
press launch using your domain panel
and open up your dashboard for GoDaddy next to your website you’ll see a list of the domain names you’ve bought here and if you click on it.
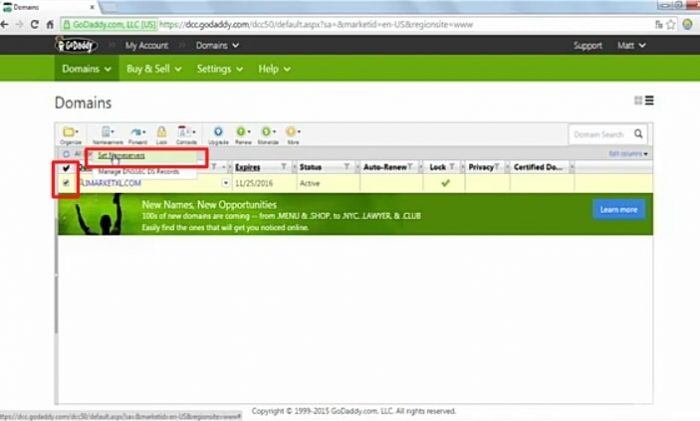
go down to servers
It will check next to it you’ll see all the options of the top left up and you just click here and go down to servers you’re, gonna see your current host in there, but if you go to the top right and you click edit name servers.
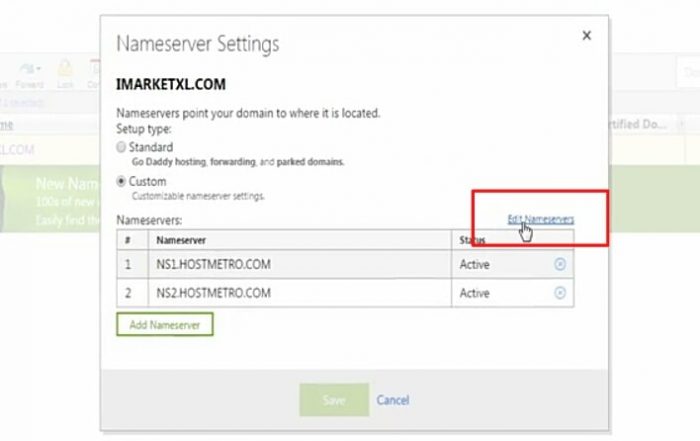
EDIT NAME SERVERS
You would then just delete the old nameservers there
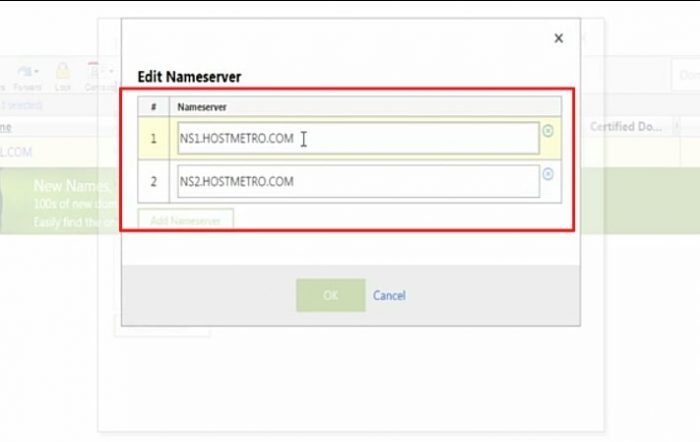
old name servers
and then you wanna go back to cloud flare and look at the two hosts or two server names, copy and paste one by one.
copy nameservers
that they gave you now the first one was dns.ns.cloudflare.com And the second was tim.ns.cloudflare.com
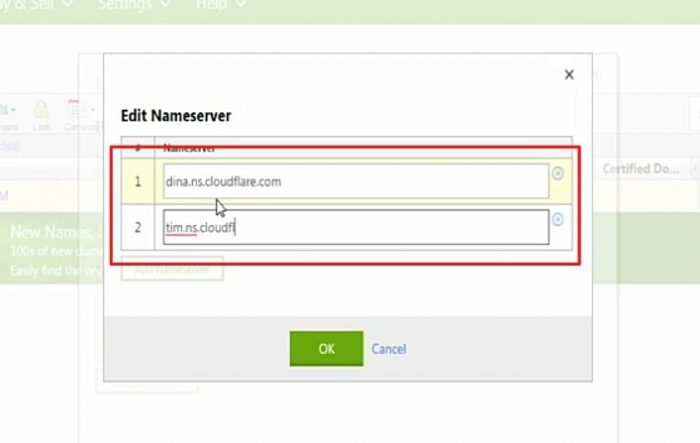
Paste Name Servers
and then after that you would just hit okay and that would change your name servers.
7 Go Back And Continue
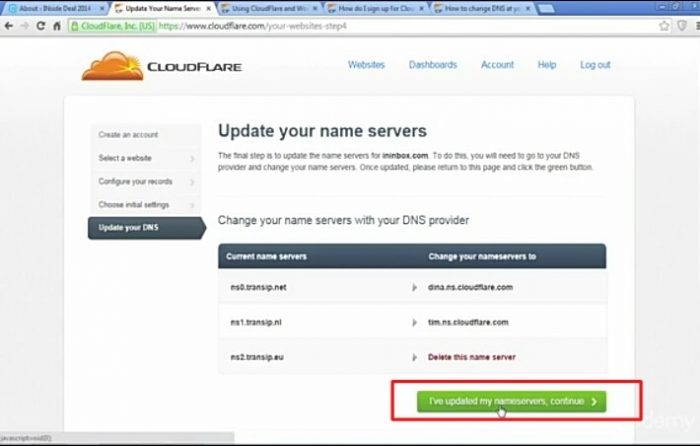
continue cloud flare
And then you can go back to Cloudflare where and just press continue and that’s really all your doing it’s not anything complicated. So cloud flare has a plugin that makes the process of handling class on your site, even easier,
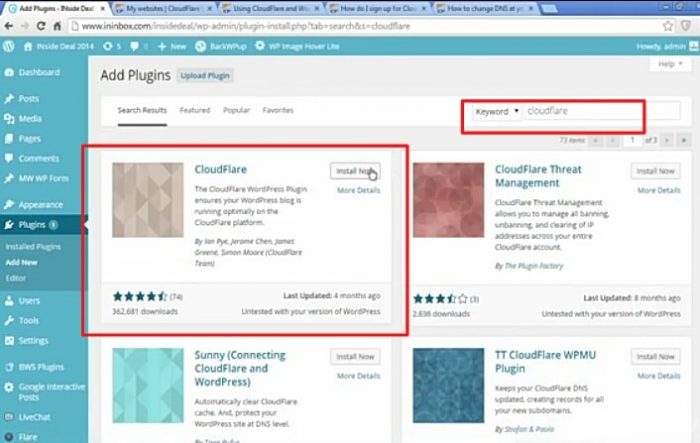
Cloud Flare WordPress Plugin
but for now, we’re gonna talk typing cloud flare into the plugins list and then install now for the plugin Hey every scroll down you’ll see you have cloud flare manager in your plugin list and that’s the basic process of setting up.
If you are looking cheap web hosting go to zainhosting. For more faster hosting you can also try out Azure WVD from Apps4Rent which is available at an affordable Azure Windows Virtual Desktop Pricing.