Taking a screenshot on an HP computer is a simple process that can be done in a few easy steps. Screenshots are helpful for capturing images of your computer screen, whether for work, school, or personal use. In this post, we will walk you through the steps to take a screenshot on your HP computer in 4 ways.
Method 1: Screenshot on HP Computer with Gemoo Snap
Gemoo Snap is a lightweight and free app that caters to a variety of screenshot needs. It enables users to take quick screenshots, provide feedback on images, enhance screenshots, take website screenshots, pin them, and upload them to the cloud.
Gemoo Snap facilitates effective communication through annotated images. Whether you need to report a bug, provide feedback on a design or assignment, or annotate your thoughts, Gemoo Snap allows you to create a screenshot quickly and easily.
Step 1: Download Gemoo Snap onto your computer for free. Alternatively, you can opt to install the Chrome extension (Add to Chrome). Choose the option that suits you best.
Step 2: Choose a screenshot mode: Quick Screenshot, Clipboard Screenshot, or Screenshot & Beautify.

Take a Screenshot with Gemoo Snap – Step 2
Step 3. Start taking screenshots the way you like.

Take a Screenshot with Gemoo Snap – Step 3
Step 4: You can also edit the image after that.
Method 2. Take a Screenshot via Print Screen Key
Step 1. Determine the type of screenshot you want to take
Before taking a screenshot, you need to decide what type of screenshot you want to capture. There are three types of screenshots you can take on an HP computer:
– Full-screen screenshot: This captures the entire screen of your computer.
– Window screenshot: This captures a specific window on your computer.
– Custom screenshot: This allows you to select a specific area of your screen to capture.
Step 2: Press the Print Screen key
Once you have decided on the type of screenshot you want to take, press the Print Screen key on your keyboard. This key is usually labeled as “PrtScn” or “Print Scr” and is located in the top row of your keyboard.
Step 3: Paste the screenshot
After pressing the Print Screen key, the screenshot is saved to your computer’s clipboard. To access the screenshot, open an image editing program such as Paint or Photoshop, press Ctrl + V, or right-click and select “Paste” to paste the screenshot into the program.
Step 4: Save the screenshot
Once you have pasted the screenshot into an image editing program, you can save it as an image file. To do this, click on “File” and select “Save As” to save the screenshot to your desired location on your computer.
Method 3: Using the Windows Snipping Tool
The Snipping Tool is a built-in feature of Windows that allows you to capture screenshots of your computer screen. It’s easy to use and offers several different options for capturing screenshots. Here’s how to use the Snipping Tool on your HP computer:
Step 1. Open the Snipping Tool.
You can find it by typing “Snipping Tool” into the search bar on your taskbar.
Windows Snipping Tool
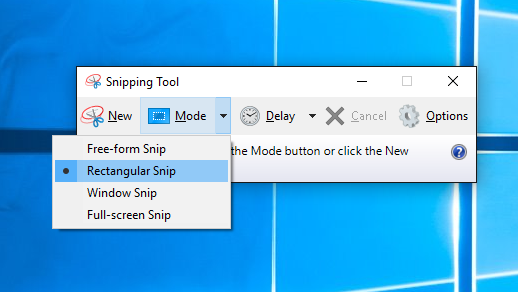
Step 2. Choose from four different types of snips
Once the Snipping Tool is open, you’ll see a small window with several options. You can choose from four different types of snips: Free-form Snip, Rectangular Snip, Window Snip, or Full-screen Snip.
Step 3. Select the type of snip you want to take.
For example, if you want to capture a specific area of your screen, choose the Rectangular Snip option.
Step 4. Use your mouse to select the area.
Select the screen you want to capture. Once you’ve selected the area, release your mouse button.
Step 5. Save the screenshot
The snip will appear in the Snipping Tool window. You can save the snip as an image file by clicking “File” and then “Save As.”
Step 6. Edit your screenshot if you want
If you want to edit the snip, you can use the tools in the Snipping Tool window. For example, you can use the Pen tool to draw on the snip or the Highlighter tool to highlight specific areas.
Once you’re happy with your snip, you can use it. Simply insert the image into your post like you would any other image.
Method 4: Try the Windows Game Bar
The Windows Game Bar is a built-in feature in Windows 10 that allows you to capture screenshots and record gameplay. It is a useful tool for gamers but can also be used for other purposes, such as taking screenshots of your desktop or applications. Here are the steps to take a screenshot using the Windows Game Bar:
Step 1: Open the application or window that you want to capture.
Step 2: Press the Windows key + G to open the Game Bar.
Step 3: Click on the camera icon or press the Windows key + Alt + PrtScn to take a screenshot.
Step 4: The screenshot will be saved in the Captures folder in your Videos library.
Conclusion
In conclusion, taking a screenshot on an HP computer is a simple process that can be done in just a few steps. By following the 4 ways outlined in this post, you can easily capture screenshots of your computer screen for various purposes.