When it comes to data security, password protection is crucial to keeping your private information safe in Excel spreadsheets. However, there may be instances where you need to remove the password from an Excel file for legitimate reasons. In this article, we will explore the techniques and methods to remove password from Excel files, giving you the knowledge to regain access to your data while keeping your information secure.
Whether you have forgotten the password or need to share a password-free version, our comprehensive insights will help you overcome the barriers of Excel password-protect files and regain control of your valuable content. So, keep on reading.
Part 1. How Password Protect Excel File Works
Excel files are a crucial tool for managing modern data. They allow users to organize and manipulate data in a structured framework, making them versatile for both personal and professional settings. These files are commonly referred to as “.xlsx” files and are used for a variety of tasks such as data entry, analysis, and visualization. Excel sheets are valuable assets that enable users to store financial records, conduct statistical analyses, and track inventory.
However, one of the most crucial aspects of Excel file management is password protection. This security feature ensures that only authorized individuals can access or modify the content by requiring a password. However, password protection is essential for safeguarding confidential and sensitive information.
How to Open a Password-Protected Excel File with a Known Password
If you already know the password of your password-protected Excel file, then unlocking it is a straightforward process. Follow the step-by-step guide below to quickly access your data.
All you need to do is:
- Firstly, locate the Excel file you wish to open. You can do this by navigating to its location and double-clicking on it. Alternatively, you can right-click on the file and select the ‘open’ option. These are the most commonly used methods for opening files.
- However, the file is password-protected, a pop-up dialog box will appear, prompting you to enter the password. Once you input the correct password, the sheet will be unprotected, allowing you to view and work with its contents.
- After entering the password, click on the ‘OK’ option, typically found at the bottom right of the pop-up. This action will grant you access to the file, making it ready for you to interact with as needed.
What’s great about this process is that it works consistently across different Excel versions, such as Excel 2010, Excel 2016, or any other edition. However, keep in mind that this method only works when you already know the password. But what if, you need to open an unprotect Excel workbook without password, continue reading to find the easiest alternative methods.
Part 2. Remove Excel Password with 3 Simple Methods
When dealing with password-protected Excel files and you don’t remember the password, it can be challenging to access the data. However, there are three amazing methods that you can employ to remove the password and regain access to your Excel file.
Method No: 01. Unlock Password-Protected Excel by Changing the File Extension
These simple yet straightforward steps can assist you in unlocking password-protected Excel files, particularly for Microsoft Office 2010 or any prior versions. However, please be advised that these steps may not be entirely compatible with newer Microsoft Office versions.
All you have to do is:
- Firstly, it is recommended that you create a backup of the password-protected Excel file.
- Then, proceed to rename the file by right-clicking on it and selecting the ‘rename’ option.
- Even if it has a .csv or .xls extension, change the file extension to .zip.
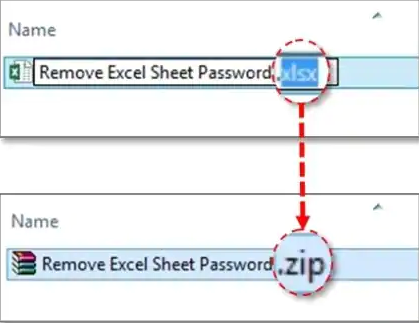
Remove Password from Excel File
- Afterward, unzip the contents and locate the .xml file.
- Next, Click on the .xml file and open it using an XML editor.

Remove Password from Excel File
- Press ‘Ctrl + F’: Simultaneously press the Ctrl and F keys to search for the word ‘SheetProtection.’
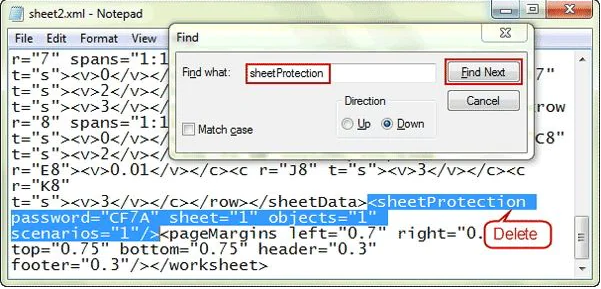
Remove Password from Excel File
- Once you’ve found the word, delete it from the file.
- After removing the word, save the file.
- Finally, revert the file extension from .zip to .xls or .csv, as per your preference.
Upon completing easy steps, all worksheets within the Excel file will be left unprotected, enabling you to access your files without the need to enter a password. This process is particularly useful for individuals who always forget Excel passwords.
Method No: 02. Remove Password from Excel File Online Without Password
Forgetting your Excel password can be a frustrating predicament. While online tools can seem like a convenient solution, it’s important to ensure a strong and reliable internet connection to avoid interruptions during the process. It’s worth noting that not all files can be unlocked using online methods. The effectiveness of these methods depends on the strength of the password.

Remove Password from Excel File
Moreover, while online tools can be a quick fix, they are not entirely foolproof, making them best suited for non-sensitive data. For those who choose to use online tools to unlock their Excel passwords, here are the key steps to follow:
- Open a website: Access the chosen online portal for the task.
- Upload the file: Once on the portal, you’ll find an option to either drop the Excel file or click to upload it.
- Wait for the process to complete: The password recovery process will begin automatically after uploading. The duration depends on several factors, with password strength being a significant one. You can monitor the recovery progress on-screen.
- Note down the password: When the recovery process concludes, the cracked password will be visible on your screen. Make sure to take note of it to avoid future forgetfulness and it’s done.
Method No: 03. Unprotect Excel Workbook Without Password Via VBA Code
If you need to unprotect an Excel workbook but don’t know the password, you can use the VBA (Visual Basic for Applications) code to bypass the password protection. This method involves using a macro. Here is a simple guide on how to do it:
- Enable Developer Tab: If you haven’t already, you need to enable the Developer tab in Excel. Go to File>Options>Customize Ribbon, and check the “Developer” option.
- Open VBA Editor: Click on the Developer tab, and then choose “Visual Basic.” This will open the VBA editor.
- Insert New Module: In the VBA editor, go to “Insert” and select “Module” to insert a new module.
- Enter the Code: Enter the following VBA code into the module:
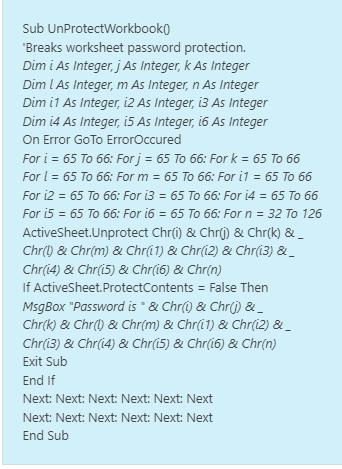
Remove Password from Excel File
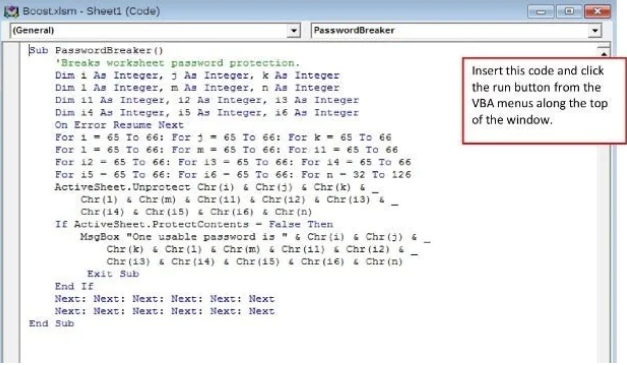
Remove Password from Excel File
- Save the File: After entering the provided code into the code window, click the ‘Save’ button to save your file as a macro-enabled workbook.
- Execute the Code: To run the code and perform the specified actions, press the F5 key. Make sure to save the file as a macro-enabled workbook after copying the code. This will allow you to execute the code.
However, by following the steps carefully, you can now successfully remove the protection from Excel files without the need for additional software, using VBA code.
Part 3. How to Repair Corrupted or Damaged Excel Files
Wondershare Repairit File Repair is a powerful and user-friendly tool that enables you to rescue your valuable data from corrupted or damaged files. With this software, you can easily repair your crucial Excel spreadsheets, Word documents, or any other file type that may have been affected by unexpected file corruption.
The tool features a simple and easy-to-use interface and uses a range of advanced repair algorithms that make file recovery accessible to both novice and experienced users. However, in the following sections, we’ll explore its main features and provide a step-by-step guide on how to use Wondershare Repairit to repair damaged Excel files and recover your critical data.
Main Features
- Repair damaged Excel files with all levels of corruption, including blank files, files not opening, unrecognizable format, unreadable content, and files with changed layouts.
- User-friendly and intuitive interface that simplifies the file repair process, making it accessible to both novice and experienced users.
- Repair multiple damaged Excel files simultaneously, saving you time and effort when dealing with several corrupted documents.
- Compatible with Microsoft Excel 2019, 2016, 2013, 2010, 2007, and Office 365, ensuring seamless recovery for a wide range of Excel document formats.
Step-by-Step Guide
Step 1. Download and launch Wondershare Repairit File Repair.

Wondershare Repairit
Step 2. Click on the +Add button and upload all the corrupted Excel files.

Wondershare Repairit
Step 3. Once all the files are uploaded, click the Repair button to start the process.

Wondershare Repairit
Step 4. After the repair process is finished, preview all the files and click the Save All button. Your all corrupted Excel files are now repaired.

Wondershare Repairit
To Wrap Up
At the end of this article, we hope that you have gained a thorough understanding of managing password-protected Excel files. We have explored the three best ways to effectively manage Excel files, along with providing a step-by-step guide on how to open password-protected files using a known password. For those who have forgotten their Excel passwords, we have also introduced three alternative methods such as changing file extensions, online password removers, and VBA codes to unprotected workbooks.
Moreover, we have examined the versatility of Wondershare Repairit File Repair, which can repair corrupted or damaged Excel files with varying degrees of corruption. So, whether you need to remove passwords, repair damaged files, or protect your data, these methods and tools ensure that you can confidently and stress-freely manage your Excel files. Thank you for reading.


