
Photo quality improvement denotes enhancing an image to avoid pixelation, blur, or distortion when zoomed in. It also means beautifying the image to improve its look. To achieve enhanced photos, you’ll need third-party software. The most common and popular tool is Photoshop, therefore, several people question that how to improve a photo in Photoshop.
You’ll need a paid subscription to use Photoshop. Fortunately, Photo Effects is an alternative that’s available for Windows and Mac OS for free.
Overview Of Photo Effects
Let’s quickly cover the features of this tool in brief. This software permits applying cool and stunning photo effects with ease. The inbuilt presets make it possible to redefine your images like a pro. It’s user-friendly and delivers rapid outputs. For all that, it uses advanced algorithms and AI (Artificial Intelligence). Some notable features are as follows:
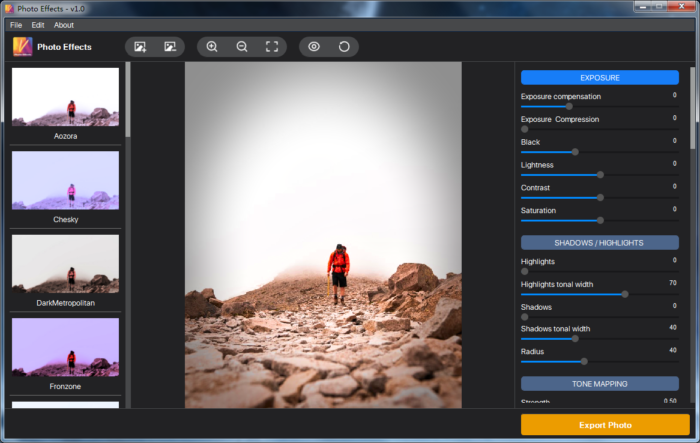
- Set the exposure such as light, contrast, and saturation adjustment.
- Tweak shadows, highlights, and their tone.
- You can alter the tone mapping that’ll add more details to your flat HDR images.
- The dynamic range compression (DRC) can modify your image’s illumination to enhance the contrast.
- To make your photos clearer, you can use the inbuilt feature to sharpen the image.
- Noise reduction targets to reduce noise in a digital image that results in improved quality.
- Images ruined due to poor lighting can be bought back to life by adjusting the color temperature and white balance.
Still searching for more? This isn’t the end of the list. Download to discover more exciting features such as Vibrance, Channel Mixer, Soft Light, Vignette, etc. Use all of them to learn what they do.
Why Use Photo Effects? Key Benefits
Wondering why go for Photo Effects instead of any other similar tool? Here’s why:
- It’s user-friendly. You can get started immediately as you won’t require any Photoshop skills. It’s designed for newbies.
- Preset filters application is possible within a single click. Moreover, you can customize filters and effects or use 15+ preset effects.
- The user interface is so simple, that you’ll fall in love with it. One notable widget on the interface is the slider. Move the slider to customize the effects.
How To Adjust The Photo Effects- Quick Simple Steps
- The interface is going to be almost the same whether you’re using Mac or Windows version. Just the touch and feel will change due to OS differences.
- Like all similar tools, you get started by uploading your image to the software.
- Once done, you’ll find the list of preset, tools, and filters on the left of the screen.
- Your image will be on the stage, in the center.
- When you select any tool or preset from the left menu, you’ll notice several sliders on the right side.
- These sliders are used to adjust the levels of exposure, shadows, highlights, tone mapping, etc.
- Slide them to view the changes immediately on the screen. If you’re not happy with the results, just undo or slide back to the previous values to revert.
- Don’t hesitate to play with the interface to discover new things. That way, you’ll get familiar with the interface and will gain a lot of photo editing experience.
- After you’re done with your editing work, the final step will be exporting your craft. You’ll find a yellow button that says “Export Photo”. Click on it to export your newly crafted content.
How To Improve A Photo In Photoshop- Quick Photo Enhancement
- Launch the software and open your image.
- While editing, you might make mistakes. Hence, save a copy by choosing the “save as” option under the file menu.
That way, you’re now editing a copy instead of the original image. Whenever you want to restart, you can start fresh from the first step.
- On the left, you’ll find the list of tools. If you’re not aware of the icons, just hover your mouse cursor, and the name will appear in the tooltip.
- To improve your photo, apply features such as reduce noise, sharpen, blur, smudge, sponge, dodge, spot heal, red-eye reduction, etc. These filters will be available under the “Filter” menu in the menu bar.
- When you select a filter such as “reduce noise”, a pop-up box will appear. You’ll find sliders to adjust the values. Pretty much like in the case of Photo Effects.
- Under the image menu, look for “adjustments”. It’ll reveal all the tools to enhance photos such as brightness adjustment, color, and white balance, etc. Use them to further enhance your image.
- Finally, when you’re done with your editing work, save the image under the file menu. Choose the desired file extension such as .jpeg, .png, etc.
Pinetools
Pinetools is a cloud-based online tool, which offers several artistic features such as image editing, image enhancement via color and brightness control, etc. It allows hex code generation for colors, create gradient colors by mixing two colors, etc.
You’ll find several minor tools to work on text such as reversing or sorting your list, etc. It’s free to use and works directly in your web browser. No need to download any software.
Image Enhancement using Pinetools
Want to learn how to improve photo quality using pinetools? Keep reading this section.
- Visit its website.
- On the left, you’ll find the list of all the tools offered by the website.
- To edit your image, select “Images”.
- A list of all the tools related to image enhancement and editing must appear.
- Suppose you want to change the exposure, simply click “change exposure”.
- A new page will open up, asking you to upload your image. Do so, and upon successful upload, slide the slider to change the exposure value.
- Repeat the same process to use other image processing-related tools on the website.
Conclusion
Image editing and enhancement no longer necessarily require expert designer skills. Several online and offline tools are available to make your life easier such as Photo Effects. Most of them are free to use that offer limited functionality. While other paid software does offer extended features but requires brief training before getting started such as Photoshop.


You must be logged in to post a comment.